Feature guide
The Planner
Organize your recordings, events and posts on a calendar, see how your feed will look and publish to your connected accounts.
In this guide
You'll find it in the menu, under Planner, with your brand selected.
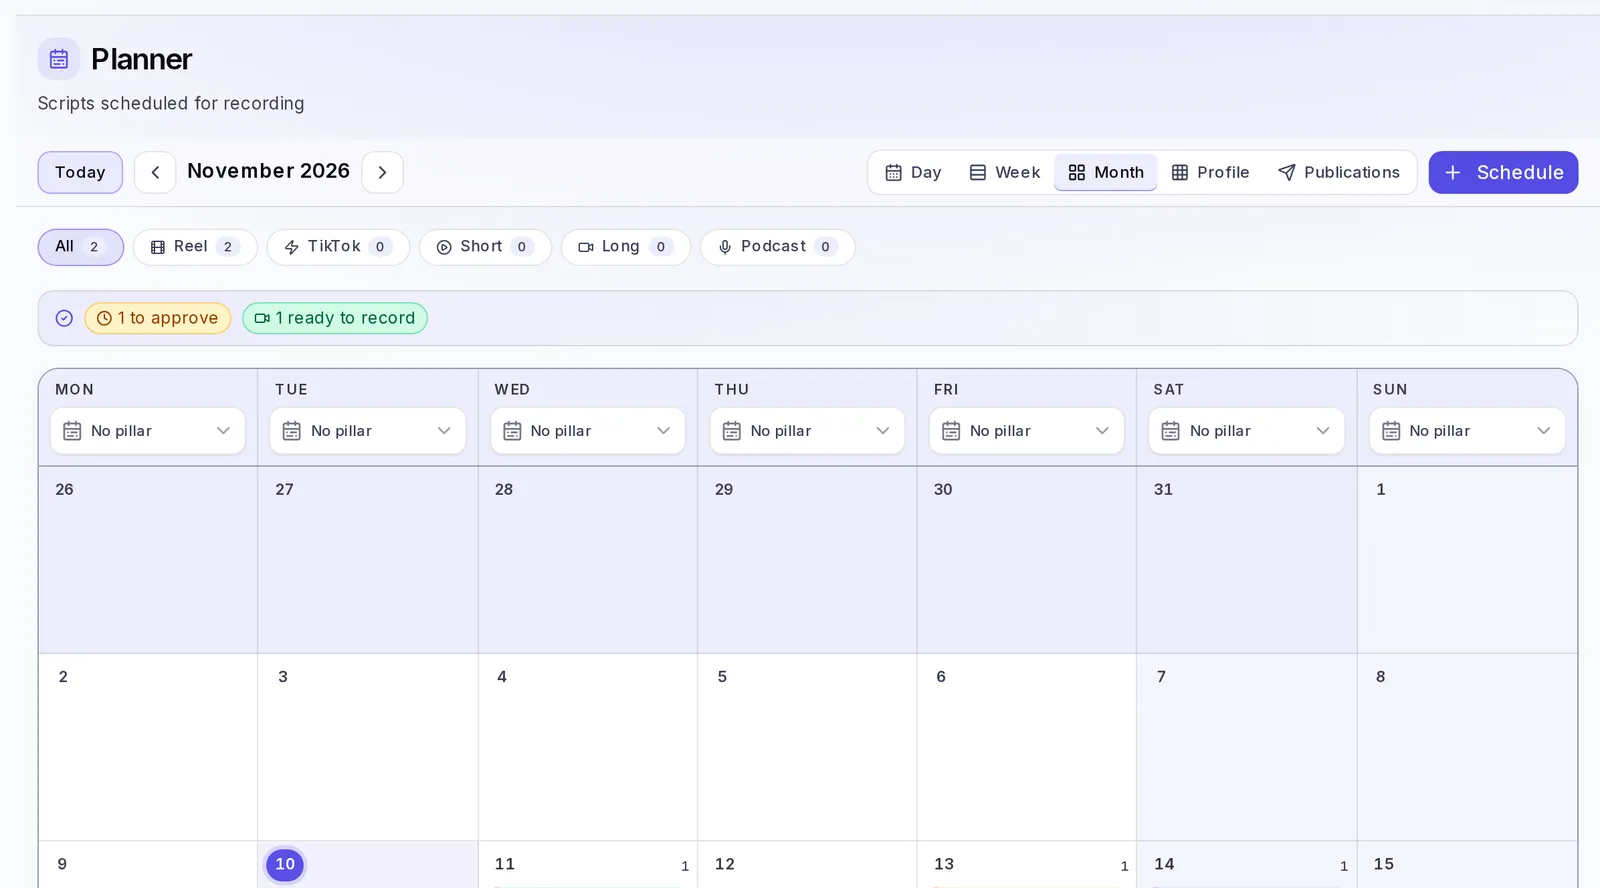
What you'll find here
At the top is the toolbar, which stays put when you scroll down the page:
- Today takes you back to today, and the arrows take you to the previous or next day, week or month.
- The Brand filter (and the Sub-account filter if you're an agency) to see only one brand's items or All brands.
- The view selector: Day, Week, Month, Profile and Publications.
- The Schedule button, with everything you can create.
Below it you'll see a row of format filters: All, Reel, TikTok, Short, Long and Podcast, each with how many recordings it has in the period. Tap one to see only that format.
If there are pending items, a strip sums them up: how many are waiting for approval, how many date counterproposals there are and how many recordings are ready to record.
Month, week, day, profile and publications views
- Month: the whole month at a glance. Tap any empty part of a day to open it in detail. It's the view that opens the first time.
- Week: the seven days in columns, with the time of each item.
- Day: a single day hour by hour. It's the view that opens on your phone.
- Profile: your Instagram grid, to see how your feed will look (we cover this below).
- Publications: your videos and images to publish and what's waiting for approval. It appears when you can publish on some network or when you have something to approve. The tab shows a number when there's something that needs your decision.
The Planner remembers the last view you chose and opens it next time.
On the grid you'll see three types of cards: script recordings (with their status), your own events and social media posts (with the network, the time and their status).
Schedule a script recording
- Tap Schedule and choose Schedule script. You can also use a day's + button.
- If you're an agency, choose the Sub-account. Then choose the Brand.
- Search for and choose the Script. The Content format is taken from the script.
- Choose the date and time in Scheduled for. You can tap a Suggested time (9:00 AM, 12:00 PM, 3:00 PM or 6:00 PM).
- If you want, write a Note and, in Tag members, choose the people on your team who need to know. They get a notification.
- Tap Schedule script.
If there's already another recording for that brand at the same time, we let you know. You can choose another time or tap Schedule anyway.
Tap a recording to open its card: there you see the date, the brand, the format, the script (with View script), the caption to copy, the notes and who was tagged.
A recording's statuses
- Awaiting approval: just scheduled.
- Change requested: someone proposed another date.
- Approved: ready to record. Mark as recorded appears on its card.
- Rejected: it won't be recorded on that date.
- Recorded: it's already been recorded.
A rejected or recorded recording can be set in motion again with Reschedule: it goes back to pending so you can choose another date and it gets approved again. If you're an agency, you can also tap Unschedule: the script is still available and you can schedule it again.
Propose another recording date
If you work with an agency and it scheduled a recording on a date that doesn't work for you:
- Open the recording on the calendar.
- Tap Propose change.
- Choose the Proposed new date and, if you want, explain in Reason why it would work better.
- Tap Propose change to send it.
The recording becomes Change requested and your agency decides: with Accept proposal the recording moves to your date; with Keep original date it stays where it was. Either way it goes back to waiting for your approval.
If the date does work for you, tap Approve. If you don't want to record that script, tap Reject and write the reason.
Add your own event
For meetings, deliveries or any date you want to keep in sight:
- Tap Schedule and choose Add event (or use a day's +).
- Type the Title, for example "Monthly content meeting".
- Choose the Event type: Meeting, Deadline or Other.
- If it's for a particular brand, choose it in Brand (optional).
- Choose when it Starts and, if you want, when it Ends.
- If it's a video call, paste the Meeting link. It must start with https://.
- Add a Description with the agenda or reminders and tap Add event.
When you tap the event you'll see its details and, if it has a link, the Join meeting button. From there you can also Edit event or Delete event. Deleting it removes it from the calendar for everyone.
Move a recording or an event
If you're an agency, drag a recording's or an event's card to another day: it moves and keeps its time. A rejected or recorded recording can't be dragged.
You can also move your own event from its card with Edit event, changing when it starts and ends.
Social media posts can't be dragged. To change their date, see Change or cancel a scheduled post.
Weekly pillar plan
It helps you decide which content pillar to work on each day of the week. It's just a guide for you: it doesn't generate or limit your ideas.
- Choose a brand in the Brand filter (if you only have one, it's already selected).
- In the Month or Week views, above each day of the week you'll see Pillar of the day.
- Choose the pillar you want for that day. It saves on its own and repeats every week.
If you see No pillars, your brand doesn't have content pillars yet: add them in your brand's settings, under Content Strategy.
See how your feed will look
The Profile view draws your Instagram profile with what you have planned: scheduled recordings, carousels and posts, each in the spot it will take.
- It's for a single brand. If you have several, choose which one you want to see.
- Pieces that don't have a date yet are marked as Not scheduled.
- If a piece doesn't have a cover yet, you'll see the gap with its title. That way you can still read your profile's rhythm.
- With your Instagram connected you'll also see your photo, your followers and your current posts.
Use it to check that your feed looks varied before you record or publish.
See Roadmap tasks on the calendar
If your account has the Roadmap available and your brand has a plan, its tasks also appear in the Planner when you have a brand selected:
- In Month and Week, each day shows the tasks due that day.
- In Day you'll see the From the Roadmap section, with what's Due this day and what's In progress until another date. Tap Open Roadmap to go to your plan.
Publish to a connected account
In the Planner there are two things that look alike but aren't the same:
- Scheduling a script (with Schedule script) only puts the day you're going to record it on the calendar. It doesn't publish anything to your accounts: it's a reminder for you and your team.
- Scheduling a post (with Publish to social or Post to TikTok) does upload your image or video to the network, right now or on the day and time you choose, without you having to be online at that moment.
To schedule a post you need:
- Your account to have publishing on that network available. If you don't see Publish to social or Post to TikTok, your account doesn't have it.
- The network's account connected to your brand in Connections, with publishing allowed. We explain it in Allow publishing.
- Permission to edit in the account.
- The video or image ready: a carousel of yours, a cover, or a file you upload from your device.
If you don't see the option to publish, check your connections or ask your account owner.
There are three ways to start:
- Tap Schedule and choose Publish to social (or Post to TikTok).
- In the Publications view, tap Publish on a video or an image.
- Tap a post that hasn't gone out yet to see its status.
Schedule a post on Instagram and Facebook
- Tap Schedule and choose Publish to social.
- Choose the Brand.
- In Where do you want to publish? check Instagram, Facebook or both. With both checked you can only publish an image or a video; for a carousel or a story, leave only Instagram checked.
- In What do you want to publish? choose the format: Image, Carousel, Story, Reel or Video story on Instagram; Photo or Video on Facebook.
- In Choose the content tap the piece: your carousels, My images, Covers or your videos. You can also Upload a photo from your device or Upload a video.
- If you want, write the Text that goes with the post.
- In When? choose Publish now or Schedule with a date and time.
- Tap Schedule post (or Publish now).
If something fails when publishing it, we let you know. If part of it did go out, we tell you which part and leave only what's missing checked so it isn't published twice.
If you have Automatic replies, in When it goes live you can choose one to reply by message to whoever comments. See Automatic replies.
Choose a Reel's cover
When you publish an Instagram Reel or a Facebook Video, Cover appears with three options:
- Automatic: the network chooses the image.
- A moment from the video: move the bar to the instant you want as the cover.
- Upload a photo: choose a JPG, PNG or WebP image up to 10 MB.
Publish on TikTok
If your account has publishing on TikTok available and the brand has its TikTok connected:
- Tap Schedule and choose Post to TikTok.
- Choose the Brand. You'll see which account It will be posted to.
- In What you're posting choose A video or Photos (a carousel or a photo).
- Write the Description and, for photos, a Title.
- Choose Who can see it and whether you let people Comment, Duet or Stitch. If you're posting photos, you can check Add music automatically.
- If the content promotes something, turn on This content promotes something and choose whether it's your own brand or a paid collaboration.
- Check Made with artificial intelligence if the post has realistic images, video or voice created with AI: TikTok will add its label. This option and Add music automatically start unchecked.
- If you'd rather finish it yourself in the app, check Send as a draft to my TikTok. It arrives in the TikTok app and you post it from there: you choose the labels and permissions there.
- Choose When and tap Schedule on TikTok (or Schedule draft).
TikTok allows up to 15 posts in 24 hours per account.
See scheduled posts
- In Month, Week and Day, each post appears as a card on its day and time. What's already been published appears on the day it went out.
- Tap a card that has already gone out to open it on its network. If it hasn't gone out yet, the publish window opens with the Scheduled posts list.
- In the Publications view, each video and image says how it ended up.
Post statuses
- Scheduled: it will go out at the chosen time.
- Awaiting approval or To approve: your client has to approve it before its time.
- Publishing: it's going out right now.
- Published: it's already on the network. You can open it with View on Instagram, View on Facebook or View on TikTok.
- Draft in TikTok: it reached the TikTok app for you to finish it there.
- Couldn't post: something failed. We let you know the reason.
- Changes requested: your client rejected it and it won't go out.
- Not posted: not approved: nobody approved it in time.
- Canceled: you withdrew it.
Change or cancel a scheduled post
A scheduled post can't be edited: to change the content, the text or the time, cancel it and schedule it again.
- Open Publish to social (or tap the post on the calendar).
- In Scheduled posts, find the one you want to change.
- Tap Cancel post.
- Schedule it again with the changes.
The Publications view
Here you have, by brand, everything you can publish:
- At the top, To approve, only when there's something pending.
- The Videos tab, with the brand's videos. Tap Upload video to add one, Rename to rename it or Delete video to remove it. Each video says whether it's Scheduled, when it was published or whether it didn't go out.
- The Images tab, with photos for your posts. They don't mix with the brand's library. Tap Upload images to add some.
- Filters to Search by name, by Status (Not published, Awaiting approval, Scheduled, Published, Didn't go out) and by Publishing day.
You can't delete a video or an image that has a scheduled post: withdraw the post first. Videos are deleted automatically a few days after being published to free up space, as the screen tells you, and their history stays.
Approve a post or ask for changes
When an agency schedules a post on its client's brand, the client has to approve it before its time. If nobody approves it, it isn't published.
If you're the client:
- Open Publications. In To approve you'll see what's Waiting for your approval, with a preview. You also get a notice.
- Tap Approve and it will go out at the scheduled time.
- Or tap Request changes, write what you'd like to change and tap Send to the agency.
If you're the agency:
- In Sent to your clients you see how each one ended up.
- Schedule it with at least 30 minutes to spare, so your client has time to approve it.
- If your client asked for changes, make the changes and schedule it again from Publish to social.
- If it didn't go out because nobody approved it, tap Reschedule, choose another date and tap Send for approval. Or tap Withdraw post if it's no longer happening.
Script recordings waiting for a decision also appear in To approve.
If something doesn't work
- I don't see "Schedule": if your account is managed by an agency, it schedules for you. You can approve, propose another date and, if you have your accounts connected, publish.
- "Publishing isn't authorized yet": your account is connected but without permission to publish. Go to Connections and tap Allow publishing.
- "The connection for … expired": connect the account again in Connections with Reconnect. If your agency or your client connected it, ask that person to do it.
- "Nobody on your client's account can approve": ask your client to invite someone with edit permission to their team.